Exploring Flexbox
Like everyone else I've been playing around with the newly released React Native. Buckets of fun! But I was quickly made aware that I still haven't really understood flexbox, which React Native uses for layout.
In order to alleviate that I built an interactive demo app where you can change the related props for the container and the children, and see first hand what the resulting layout looks like. This helped me a lot, so I share it here hoping it can help you too! You can try it out below, and it is also published here.
Putting the demo app together was a lot of fun! I used React (of course), and it turned out to be a great fit for this particular project. Throughout the rest of this post I'll walk through the source code.
Components
The app is made up by four components:
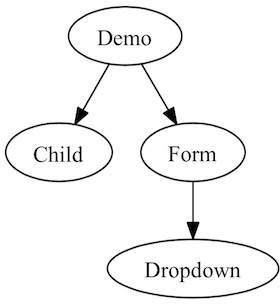
The top level Demo component uses Child to display the flex children. It also renders the two Forms, who in turn uses Dropdown for each individual control.
Demo
Let's first look at the Demo component. The file (demo.js) contains the regular class definition as well as the flex data blueprint:
var parentoptions = {
  flexDirection: ["row","row-reverse","column","column-reverse"],
  justifyContent: ["flex-start","flex-end","center","space-between","space-around"],
  alignItems: ["flex-start","flex-end","center","stretch","baseline"],
  flexWrap: ["nowrap","wrap","wrap-reverse"],
  alignContent: ["flex-start","flex-end","center","stretch","space-between","space-around"]
};

var childoptions = {
  alignSelf: ["auto","flex-start","flex-end","center","baseline","stretch"],
  flexGrow: _.range(0,6),
  order: _.range(-10,11)
};

var Demo = React.createClass({
  getInitialState: function(){...},
  setValue: function(){...},
  render: function(){...}
});
These are used to build the initial state of the component:
getInitialState: function(){
  return {
    parent: _.mapValues(parentoptions,_.first),
    children: _.range(1,5).map(function(n){
      return _.extend(_.mapValues(childoptions,_.first),{ ID: n, order: 0, flexGrow: 0 });
    }),
    selectedId: 0
  };
}
As you can see we have three state variables:
parentcontains the currently selected container options. To begin with we select the first option from each array of property values.childrencontains an array with an option object for each child. Again we use the first option as default except forflexGrowandorder. Each child is also given a unique id.selectedIdcontains the position of the currently selected child.
The app implements a bare-bones cursor, similar to React cursor or Cortex. The child components will get callbacks that when called update Demo's state. This is implemented through the setValues method:
setValue: function(){
  var arr = Array.prototype.slice.call(arguments),
      val = arr.pop(),
      prop = arr.pop(),
      clone = _.cloneDeep(this.state),
      pointer = clone;
  while(arr.length) pointer = pointer[arr.shift()];
  pointer[prop] = _.isFinite(parseInt(val)) ? parseInt(val) : val;
  this.setState(clone);
}
If we did setValue("children",0,"alignSelf","stretch"), then that would equal this.state["children"][0]["alignSelf"] = "stretch".
Inside the render method of Demo we pass callbacks to the child components tied to setValue, with the arguments partly prefilled.
  render: function(){
    var s = this.state, child = s.selectedId, cbmaker = Function.prototype.bind.bind(this.setValue,this);
    return (
      <div className="wrapper" key={Date()}>
        <div className="explanation">...</div>
        <div className="forms">
          <Form title="container" options={parentoptions} values={s.parent} callback={cbmaker("parent")} />
          <Form title={"child #"+(child+1)} options={childoptions} values={s.children[child]} callback={cbmaker("children",child)} />
        </div>
        <div className="container" style={s.parent}>
          {s.children.map(function(c,n){
            return <Child key={c.ID} def={c} selected={n===child} callback={cbmaker("selectedId",n)} />;
          },this)}
        </div>
      </div>
    );
  }
Yes, I did feel rather smug when using bind on bind to define cbmaker. :)
Child
The Child component is rather simple - it receives an object of styles which it should apply, and also write out.
var Child = React.createClass({
  propTypes: {
    def: ptypes.objectOf(ptypes.oneOfType([ptypes.string, ptypes.number]))
      .isRequired,
    selected: ptypes.bool,
    callback: ptypes.func.isRequired
  },
  render: function() {
    var p = this.props;
    return (
      <div
        onClick={_.ary(p.callback, 0)}
        style={p.def}
        className={"child" + (p.selected ? " selectedchild" : "")}
      >
        {_.map(
          p.def,
          function(val, key) {
            return (
              <div key={key}>
                {key}: {val}
              </div>
            );
          },
          this
        )}
      </div>
    );
  }
});
Notice how we must do _.ary(p.callback,0) to prevent the click event from being passed along, messing up the setValue call in Demo.
Form
The Form component take an options object, a values object containing the currently selected options, a title and a callback. It will then use a Dropdown component for each property in options/values.
var Form = React.createClass({
  propTypes: {
    options: ptypes.objectOf(
      ptypes.arrayOf(ptypes.oneOfType([ptypes.string, ptypes.number]))
    ).isRequired,
    values: ptypes.objectOf(ptypes.oneOfType([ptypes.string, ptypes.number]))
      .isRequired,
    title: ptypes.string.isRequired,
    callback: ptypes.func.isRequired
  },
  render: function() {
    var p = this.props;
    return (
      <div className="form">
        <strong key="title">{p.title}</strong>
        {_.mapValues(
          p.options,
          function(opts, name) {
            return (
              <div key={name} className="formrow">
                <span>{name}: </span>
                <Dropdown
                  options={opts}
                  current={p.values[name]}
                  callback={p.callback.bind(this, name)}
                />
              </div>
            );
          },
          this
        )}
      </div>
    );
  }
});
Note how it passes callback along to each Dropdown but curries it further with the property name.
Dropdown
Finally, the Dropdown component renders a select control with the given values.
var Dropdown = React.createClass({
  propTypes: {
    options: ptypes.arrayOf(ptypes.oneOfType([ptypes.string, ptypes.number]))
      .isRequired,
    current: ptypes.oneOfType([ptypes.string, ptypes.number]).isRequired,
    callback: ptypes.func.isRequired
  },
  changeOption: function(e) {
    this.props.callback(this.refs.sel.getDOMNode().value);
  },
  render: function() {
    return (
      <select
        ref="sel"
        onChange={this.changeOption}
        defaultValue={"" + this.props.current}
      >
        {this.props.options.map(function(o) {
          return (
            <option key={o} value={o}>
              {o}
            </option>
          );
        })}
      </select>
    );
  }
});
Calling callback with the updated value will result in a curried call to setValue.
Wrapping up
Since the demo app by its very nature needed to cascade data changes, it turned out to be a great fit for React. Then again, most apps are!
And although flexbox can seem intimidating at first, the model at its heart is really rather simple! Yet hugely powerful, and I think it was a stroke of genious to give it the task of layout in React Native. I've done my fare share of Titanium development, but feel that using flexbox seems superior in every way.