The premise
We recently published a post that explored Redux middleware, based on Dan Abramov's minimal Redux example. During the conversations following that post it became evident that however minimal the example is, there's room for an explanation of the how and why behind it. Which is exactly what this post provides - a walkthrough of a basic Redux example!
We'll be picking apart a super simple Redux app, only slightly bigger in scope than Dan's example. Like in his example there'll be no external dependencies - this will be a pure Redux experience.
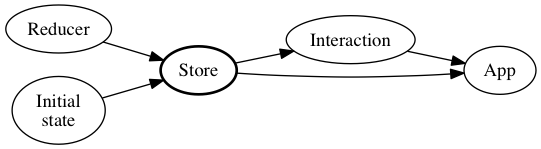
Our map
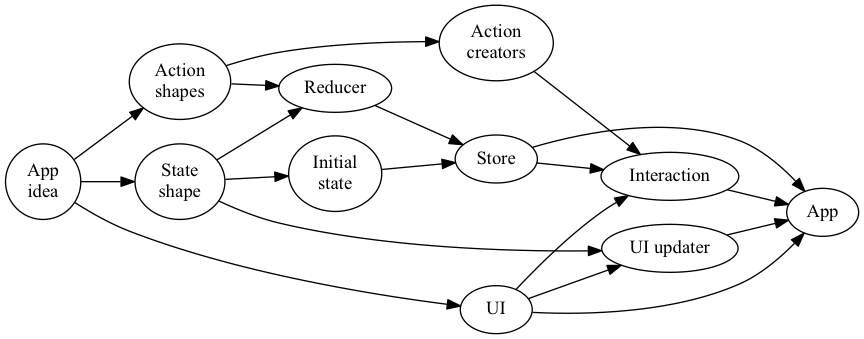
This is the journey we'll make throughout this post. It might look complicated, but don't fret - this isn't a map of the code but of everything, that is, the involved ideas and concepts as well as the code.
From here on, each headline will correspond to a concept bubble in the above map. For each concept we'll repeat a slice of the map showing the concepts that the current concept builds on, and what concepts it in turn is building up to.
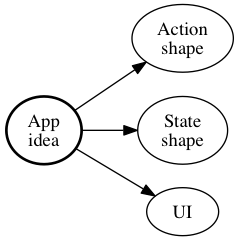
App idea
Before we can do anything, we need to have an app idea so we know what we're going to create! This will allow us to figure out a UI, the action shapes and state shape.
Let's make a simple counter app. The counter increases whenever the user clicks a button, by an amount controlled by an input. It should look something like this:
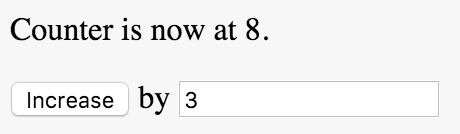
Essentially the same app that Dan built in his minimal example, except here we can increase by any amount and not just 1.
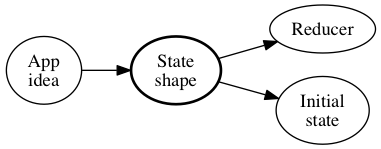
State shape
Now that we have an app idea, let's decide on the state shape. That will in turn let us figure out what our initial state should be, as well as define our reducer.
In Redux, all the app state is contained in one single object.
However, in our simple counter app, we only need to track one single thing - the current count. Thus our state can be a single number.
Initial state
Having decided on a state shape, however simple, we can now define an initial state. We'll need this to code our store.
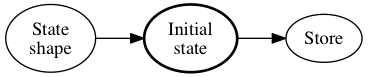
For our little app that only entails one single decision - at what number should we start the count? Let's go with 0!
This also lets us write our first line of code:
var initialstate = 0;Action shapes
Let's design the actions needed for our app idea! We need them in order to make action creators and code the reducer.
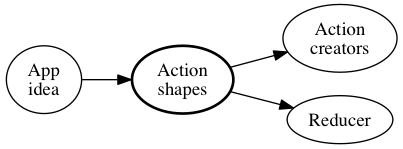
In our app only one single thing can happen - incrementing the counter. Let's decide that the action describing this event looks like this:
{
  "type": "INCREMENT",
  "by": 3
}
In Redux all actions are described by objects with a mandatory type property, and eventual further data payload props. In our case just by.
"INCREMENT" to a separate file, but in this simple example we'll live with having a single magic string like this.Reducer
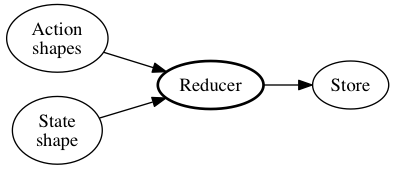
Now that we have designed the action shapes and the state shape we can move on to define our reducer! With the reducer we'll be able to instantiate a store.
Remember: a reducer in Redux lingo is simply a function that takes the current state and an action, and returns a new state:
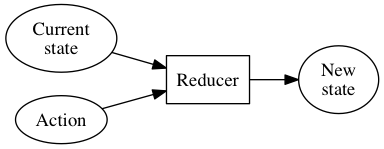
The reducer in our app just needs to deal with a single action, namely INCREMENT:
var reducer = function (state, action) {
  switch (action.type) {
    case "INCREMENT":
      return state + action.by;
    default:
      return state;
  }
};
When the INCREMENT action happens we create a new state by adding action.by to the current state.
if-else. We only used a switch because that's what a reducer normally looks like.Store
With the initial state and reducer in place, we can now create a store for our app state! That will let us code interaction for our app.
A store is instantiated using Redux.createStore:
var store = Redux.createStore(reducer, initialstate);createStore, commonly middlewares, but we don't need that here.initialstate on store creation is to have a default return value inside the reducer.Action creators
Knowing the shape of the actions lets us define action creators to be consumed by our views to create interaction.

Only one single action creator is needed in our app.
var actionCreators = {
    increment: function(int){
        return {type: 'INCREMENT', by: int};
    }
};
Note how the action creator returns an action as previously defined.
UI
Let's design the UI needed for our app idea. The next step will be to complete our app by introducing ui updating.

To create our UI we translate our mental screenshot...
...to this html:
<body>
  <p>Counter is now at <span id="num"></span>.</p>
  <p>
    <button id="incbtn">Increase</button>
    <span> by </span>
    <input type="number" id="amount" value="1" />
  </p>
</body>
UI updater function
Now that we now the state shape and the UI, we can define a UI updater function for our app!

The function updates the UI depending on the current state, which is passed in as an argument:
var updateUI = function (state) {
  var element = document.getElementById("num");
  element.innerHTML = state;
};
Since our state is just the current count, all we need to do is update the #num element with the state.
Interaction
Now we can complete our app by introducing interaction through hooking up the action creators to the UI and dispatch the result to the store!
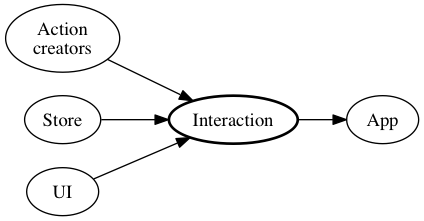
We add a click handler to the button, which calls the action creator with the value from the input. The resulting action is passed to the store.
var button = document.getElementById("incbtn");
button.addEventListener("click", function () {
  var input = document.getElementById("amount"),
    increase = parseInt(input.value),
    action = actionCreators.increment(increase);
  store.dispatch(action);
});dispatch at setup time. In a React app you'd use the React-Redux library which provides exactly such a bridge.Application
We now have all the pieces we need to finalize our app!
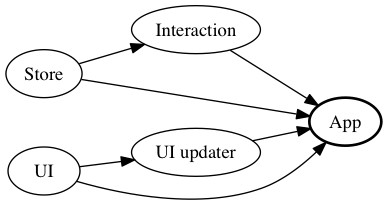
The only code we need to add is to have UI updater run whenever the store is updated and also run an initial rendering.
store.subscribe(function () {
  updateUI(store.getState());
});
updateUI(store.getState());
Now our app is fully functional!
Here is the entire source code:
<!DOCTYPE html>
<html>
  <head>
    <meta charset="utf-8" />
    <title>JS Bin</title>
    <script src="https://npmcdn.com/redux/dist/redux.js"></script>
  </head>
  <body>
    <p>Counter is now at <span id="num"></span>.</p>
    <p>
      <button id="incbtn">Increase</button>
      <span> by </span>
      <input type="number" id="amount" value="1" />
    </p>
    <script type="text/javascript">
      var initialstate = 0;

      var reducer = function (state, action) {
        switch (action.type) {
          case "INCREMENT":
            return state + action.by;
          default:
            return state;
        }
      };

      var store = Redux.createStore(reducer, initialstate);

      var actionCreators = {
        increment: function (int) {
          return { type: "INCREMENT", by: int };
        },
      };

      var updateUI = function (state, arg2) {
        var element = document.getElementById("num");
        element.innerHTML = state;
      };

      var button = document.getElementById("incbtn");
      button.addEventListener("click", function () {
        var input = document.getElementById("amount"),
          increase = parseInt(input.value),
          action = actionCreators.increment(increase);
        store.dispatch(action);
      });

      store.subscribe(function () {
        updateUI(store.getState());
      });
      updateUI(store.getState());
    </script>
  </body>
</html>
And here is the app running in an iframe:
For your convenience there's also a JSBin here.
The Redux cycle
Note how already this minimal example demonstrates the unidirectional data flow:
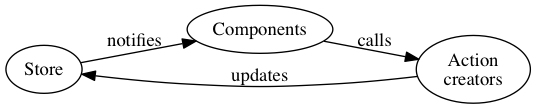
- We click a button in our "component"
- the component calls an action creator
- the result is dispatched to the store
- which uses the reducer to calculate a new state
- which causes
updateUIto update the "component"!
Wrapping up
I realise the danger of this all being Much Ado About Nothing, but I hope that I to some extent was able to convey the Redux way of thinking. It is such a powerful paradigm once you've wrapped your head around it!