Metalsmith
Metalsmith is mostly used as a static site generator, but it is really an all-purpose tool for iterating over files in a folder structure and doing something with them. Everything you want to do is a plugin. Here's what the Metalsmith code looks like for generating this blog:
Metalsmith(__dirname)
  .use(
    collections({
      articles: { pattern: "posts/*.md", sortBy: "date", reverse: true }
    })
  )
  .use(tags({ path: "tags/" }))
  .use(metallic({ classPrefix: "" }))
  .use(markdown())
  .use(sass({ outputStyle: "expanded" }))
  .use(permalinks({ pattern: "posts/:title" }))
  .use(templates({ engine: "handlebars", directory: "./templates" }))
  .source("./files")
  .destination("../.")
  .build(function(e, h) {
    if (e) {
      throw e;
    }
  });
Each use call is a plugin. Abstracting the actual file transformations to plugins is a very conscious call made by Metalsmith creators, serving to keep the Metalsmith API very small and lean.
When we first set up this blog, there was no tag plugin for Metalsmith. Now there is a pretty solid-looking one, but we had to roll our own. This post walks through that code, serving mostly as a rundown of how to create a Metalsmith plugin.
Note the second row, .use(tags({...})). That's our plugin!
Plugin structure
As you saw earlier, each plugin is a function that takes an options object as an argument. Here's the skeleton of a plugin's code:
tags = function(opts) {
  // commonly set default options here

  // return the function to be given to the `.use` call.
  return function(files, metalsmith, done) {
    // ...do something with `files` here...

    done();
  };
};
The function returned by the plugin, which then is what is passed to use, is given three arguments:
- The
filesobject given to the plugin function contains information of all processed files so far. The keys are the paths to the files. A plugin commonly loops through all these files, editing them accordingly. - The
metalsmithobject exposes the Metalsmith API. A common usecase is to access the metadata throughmetalsmith.metadata()and read/edit that. - To allow plugins to do asynchronous stuff, control isn't handed back to Metalsmith until the
donecallback is called.
Each file object contains the contents of the file, and also information from optional YAML frontmatter. For example, below is the YAML for this very blog post. Note the tags data - that's of course meant to be consumed by our tags plugin!
title: Creating a Metalsmith tag plugin
author: David
tags: [metalsmith]
date: 2014-08-09
excerpt: A walkthrough of creating a tag plugin for Metalsmith
template: post.html
Creating the tags plugin
First we need to consider what we actually want our plugin to do. What we need are two things;
- We want to add a page for each tag, listing all posts for that tag. These files need to be generated by the plugin.
- We want to add a page listing all tags found in the blog, along with a post count for each tag. The plugin could generate this file, or simply expose data making such a file easy to set up. We've elected to go with the latter, as there's too many decisions going into creating such a file.
Here's the full code for our tag plugin, meeting the needs outlined above:
tags = function(opts) {
  opts = _.defaults(opts || {}, {
    path: "tags/",
    yaml: { template: "tag.html" }
  });
  return function(files, metalsmith, done) {
    meta = metalsmith.metadata();

    // loop through all files, building an object with data about all tags
    var tags = _.reduce(
      files,
      function(memo, file, path) {
        // make sure all tags are lower case, to prevent distinction between `Backbone` and `backbone`.
        file.tags = file.tags
          ? _.map(file.tags, function(t) {
              return t.toLowerCase();
            })
          : [];
        // loop through all tags found in the `tags` YAML data for this file
        _.each(file.tags, function(tag) {
          // build a path for where the file for this tag is supposed to go
          key = opts.path + tag + "/index.html";
          memo[key] = _.defaults(
            {},
            memo[key],
            { tag: tag, posts: [], contents: "" },
            opts.yaml
          );
          memo[key].posts = _.sortBy(
            memo[key].posts.concat(file),
            "date"
          ).reverse();
        });
        return memo;
      },
      {}
    );

    // add this data to the files object, causing Metalsmith to create these files
    _.extend(files, tags);

    // add a taglist array to the metadata, to be consumed by a tagcloud type page
    meta.taglist = _.sortBy(
      _.reduce(
        tags,
        function(memo, tag) {
          return memo.concat({
            tag: tag.tag,
            count: tag.posts.length,
            posts: tag.posts
          });
        },
        []
      ),
      "count"
    ).reverse();

    // also add the same data but with tagnames as key, for use by individual tag pages
    meta.tags = _.reduce(
      tags,
      function(memo, tag) {
        memo[tag.tag] = {
          tag: tag.tag,
          count: tag.posts.length,
          posts: tag.posts
        };
        return memo;
      },
      {}
    );

    // note metalsmith that we are done!
    done();
  };
};
Consuming the plugin
First off, individual blog posts will print out their tags by simply reading from the YAML tags array. All YAML data are available as local variables:
<div class="tags">
  Tags: {{#each tags}}
  <span><a href="../../tags/{{this}}/">{{this}}</a></span>
  {{/each}}
</div>
Our taglist page contains this code, using the taglist metadata added by our plugin:
<div class="tags">
  Tags: {{#each this.taglist}}
  <span><a href="../tags/{{tag}}/">{{tag}} ({{count}})</a></span>
  {{/each}}
</div>
The main code powering the individual tag pages will be in the html template file. Note that we added a default to the opts object, telling Metalsmith to use a tags.html template file for these pages. The contents was merely set to an empty string. Even though there are no contents to the individual tag files we need to have a contents specification, otherwise Metalsmith will simply skip over generating a file.
When the template file is used to create a tag file, it will have the tag name in a local tag variable. Thus we can do the following in the template:
<div class="container">
  Posts about {{tag}}:
</div>
Utilizing Handlebars helpers
For the actual post list we created a Handlebars helper, to avoid having to put too much logic into the template file. Here's how we consume it in the template:
{{#tagPosts tag}}

<article class="{{post_class}}">
  <header class="post-header">
    <h2 class="post-title">
      <a href="../../{{path}}">{{{title}}}</a>
      <span class="post-meta">
        <time datetime="{{date}}">{{moment date 'MMM Do YYYY'}}</time>
      </span>
    </h2>
    <div class="tags">
      By:
      <span><a href="../../author/{{toLowerCase author}}">{{author}}</a></span>
    </div>
    <div class="tags">
      Tags: {{#each tags}}
      <span><a href="../../tags/{{this}}/">{{this}}</a></span>
      {{/each}}
    </div>
  </header>
  <section class="post-excerpt">
    <p>{{excerpt}}</p>
  </section>
</article>

{{/tagPosts}}
And here's the source for the tagPosts helper. It is run in the context of the Metalsmith session, which means that this points to the metadata. Our tag plugin added a tags option with tagname keys, so we can use that to access the post list for our particular tag:
Handlebars.registerHelper("tagPosts", function(tagname, options) {
  return _.reduce(
    this.tags[tagname].posts,
    function(memo, post) {
      return memo + options.fn(post);
    },
    ""
  );
});
For each call to options.fn, our helper will use the given html in the context of a post object.
Author portraits
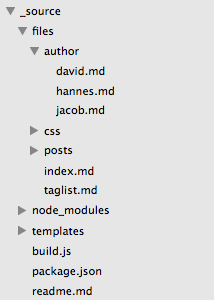
While we're talking Handlebars, let's also look at how we deal with the author portraits! Each author on this blog has their own page with a short bio and a listing of that person's posts. This is generated from markdown files for all authors in the source directory that Metalsmith iterates over:
Here's what the author file looks like for me (David):
---
template: author.html
portrait: David
---

<img src='__STATIC__/img/david.png' class='leftimg' />
David shares his time between working as a maths teacher for the Swedish Prison and Probation service, and working as a web programmer. His duties as the latter includes teaching a yearly course in advanced JavaScript at Linnaeus University.
Notice we're storing the author name in a portrait YAML variable, and sending the contents to an author.html template. Here's the relevant part of that template:
<section class="post-content">{{{contents}}}</section>

{{#authorPosts portrait}}

<article class="{{post_class}}">
  <header class="post-header">
    <h2 class="post-title">
      <a href="../../{{path}}">{{{title}}}</a>
      <span class="post-meta">
        <time datetime="{{date}}">{{moment date 'MMM Do YYYY'}}</time>
      </span>
    </h2>
    <div class="tags">
      By:
      <span><a href="../../author/{{toLowerCase author}}">{{author}}</a></span>
    </div>
    <div class="tags">
      Tags: {{#each tags}}
      <span><a href="../../tags/{{this}}/">{{this}}</a></span>
      {{/each}}
    </div>
  </header>
  <section class="post-excerpt">
    <p>{{excerpt}}</p>
  </section>
</article>

{{else}}

<section class="post-content">
  {{portrait}} hasn't written any posts yet!
</section>

{{/authorPosts}}
First we print the bio content using the contents variable, and then we call an authorPosts Handlebars helper. Note how we send two chunks of html to the helper - one to be used normally, then a fallback else chunk. In the first chunk, we assume having access to a single post by this author.
Here's the source code for this helper:
Handlebars.registerHelper("authorPosts", function(authorname, options) {
  return (
    _.reduce(
      this.articles,
      function(memo, post) {
        return post.author === authorname ? memo + options.fn(post) : memo;
      },
      ""
    ) || options.inverse(this)
  );
});
We loop through all posts, which thanks to the collection plugin can be accessed at this.articles. Then for all posts who has the name of our author in the YAML author variable, we send that post to the first html chunk through options.fn.
If there were no matching posts, we instead use the second html chunk through a call to options.inverse. Notice how we're sending this as a context, giving us access to the YAML portrait variable in the second chunk.